Lumion BLOG
Feel the space with Lumion
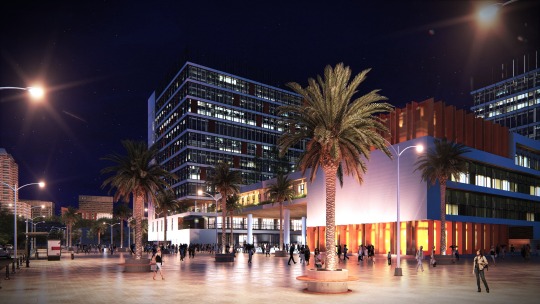
Want to know how to create a render like this?
TweetShareShareShareThe render shown below was created wholly in Lumion 7.3. This blog shows you which effects were combined to create this beautiful image. As a bonus, a couple of other renders have been included too.
The scene was built in the same way as described in a previous blog; the broad steps being:
- Import the basic 3D model (for example a SketchUp or Revit model)
- Add objects like trees and people
- Add materials from the Lumion library and adjust them
- Add lights - spot lights, line lights and area lights
- A viewpoint in the Lumion project has been carefully chosen
Having built the basic scene, the key ingredients that need to be added are the effects. The effects ‘stack’ applied in Lumion’s photo mode to create this scene is listed below. The effects were applied in the list order.
- 2-Point Perspective: Switch it on.
- Sun: It’s an evening scene, so change sun height and tweak other settings.
- Shadow: Push up the shadow coloring and brightness sliders and put the omnishadow slider full on.
- Global Illumination: Reduce the sun amount and fall-off speed sliders
- Reflection: Switch on Speedray reflections. 9 reflection planes have also been added.
- Cloud: Adjust cloud sliders until position, amount and form look right
- Analog Color Lab: Style slider on 60% and amount slider on 25%
- Chromatic Aberrations: Dispersion slider 5%, Affected area slider 100%, no safe shadows.
- Volume Clouds: Low amount, high height, softness and brightness. Tweak position.
- Color Correction: Move the sliders to emphasise blue shift and reduce red shift.
- Noise: Adjust sliders for very low intensity, no color, 100% size.
- Vignette: Adjust sliders for a small amount and high softness.
- Lens Flare: Always a question of tweaking to get this looking right for each image. Streak details and master brightness are important.
- Fog: In this case the fog brightness has been increased, fog density around 40% and fall off around 25%.
- Sharpness: Intensity set at close to zero
The action of applying effects in Lumion is simple and tweaking them is easy too. But every image needs some attention to detail and the effects for every image will always need a little tweaking.
Visualizing how you want to convey your design is often the hard part as it requires artistic attention to detail. Visualize in your mind’s eye the result you are working towards and then practice getting there using the Lumion effects.

Above: A variation of the same scene. The effects are more or less the same, it’s just a different time of day!
Creating this variation was made easy by copy-pasting the effects stack from the first and tweaking the sliders to get the scene to look a bit different. This technique will save you loads of time. Here are some other images of the same model, shown from different viewpoints in the total Lumion scene, and using different effects settings.

…. and another one!

For more information and advice about getting better and faster results, visit the online Lumion Support Center. You can also log in using your license information and access the private forum to get discover how to get more out of Lumion.
#Lumion