Lumion BLOG
Feel the space with Lumion
How to Bring Beauty to Your 3D Interior Renders
TweetShareShareShareRendering an authentic-looking interior is a balancing act of light and material, of perspective and composition.
As an architect or interior designer, rendering beautiful 3D interiors may be your favorite part. Or, it may be fraught with virtually endless nitpicking and irritation.
With tighter, more intimate spaces, the smallest changes in light and shadow can have major impacts. The arrangement of materials or objects can turn a scene from sensational to “meh.” And, if done well, your choices regarding composition can give the scene its atmosphere and emotion.
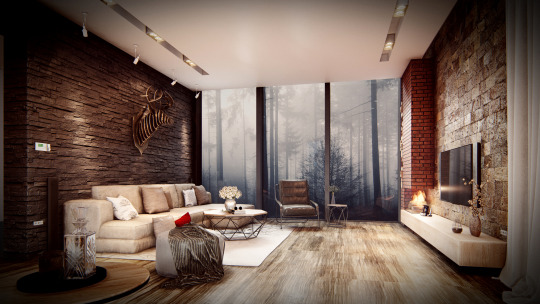
For instance, what makes the above image “authentic” and real-looking is a combination of several 3D interior rendering techniques.
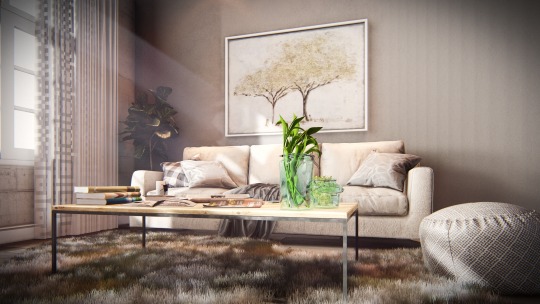
First, the most striking element is the sunlight streaming through the window and onto the bright green plant. This feature is the focal point of the image drawing the viewer’s attention.
Behind the couch and on the back wall, you can see a balance of light and shadow. The shadows lose saturation as the sunlight drowns them out. Even the position of the shadows behind the couch, and their relation to the sunlight, serves as an authentic touch giving more realism to the image.
Next, consider the throw pillows, the blanket and the opened magazines on the coffee table. These objects and materials are intelligently placed and highlight the personalities, characters and the lives of the people inhabiting the space.
With these things in mind, take a look at the following render and ask yourself how the composition of the scene can tell a story. Consider how lights, materials and camera-angle contribute to this story.
Whether it’s your first render or your 100th, by using just a few basic principles and the right supporting software, you can render beautiful interior scenes that communicate a story to your audience, whatever that story may be.
Want a Beautiful Interior? Pay Attention to Light
The human eye is more than a gushy ball in your head. When combined with your brain, it is quite capable of separating near-authenticity from the real thing, using the most miniscule of visual inaccuracies.
Your eye will adjust to just about any light temperature, no matter if it’s the warm yellow of incandescent bulbs or the dull green of fluorescent ones. When the lighting of the scene goes wayside, the eye reacts, saying, “Something doesn’t make sense here.”
Try it for yourself! One of the following two images uses a more realistic lighting strategy for the interior. Can you figure out which one?
Image #1
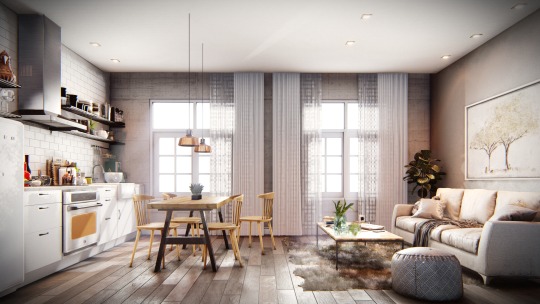
Image #2

Often, the difference between a well-lit room and a substandard one is night and day. This is because, without good lighting, your rendered image loses the depth and the atmospheric qualities that light provides.
For this reason, lighting is one of the most important things that you can learn, and it can be easy when you know what you’re doing.
Through an intelligent lighting strategy, the colors in your render will appear fresh and clean. The shadows will come from more natural directions and disperse organically, and the chances of needing to adjust white balance and exposure in post-production are diminished.
The following render, by Gian Martin Corso, is a great example of light control.

To achieve lighting like this, the first thing you need to remember is that good lighting depends on shadows, and vice versa. Without shadows, for example, it’s nearly impossible to tell the geometry of a scene. Shadows also shape the light and draw attention to it.
Tonal range is another important consideration, and it refers to the distance between pure white and pure black. An authentic-looking render will have an even range of highlights and shadows between these two extremes.
When rendering your 3D model and the scene looks a little flat and two-dimensional, or the textures have lost their oomph, the problem might be your light, shadows and tonal range. This is true whether you’re trying to achieve realistic lighting or artistic lighting.
Tips For Lighting Your 3D Render
Achieving photorealistic lighting is often the holy grail for many architects and designers. The problem with photorealism, however, is that it is sometimes not very interesting. A good interior render should show a place where the viewer wants to go.

A technique you can apply today is the three-point lighting system. Although this is definitely not the only lighting technique, it is popular because, fundamentally, it works.

The key light is the brightest light source and it’s placed at a 45-degree angle from the camera. The fill light has a lower brightness and can be placed 90 degrees opposite the key light.
The back light has the lowest brightness settings and it casts a fine, soft light designed to separate the object from the background.

Interior render sofa showroom by BABE™
Three-point lighting is especially effective when you focus on an object(s). Interior settings that don’t have a specific object, however, can still benefit from this technique. Instead of using spotlights that produce a ray of directed light, consider the following light sources:
- The sun - a soft, non-directional light that allows the light to fall evenly across the entire scene.
- Area lights - Light emitted from a wide area that can represent a fluorescent bulb or light coming in through a window.
- Line lights - Linear light with a very even lighting profile.
- OmniLights - Light emitted in all directions from a single source, useful for fill lighting.
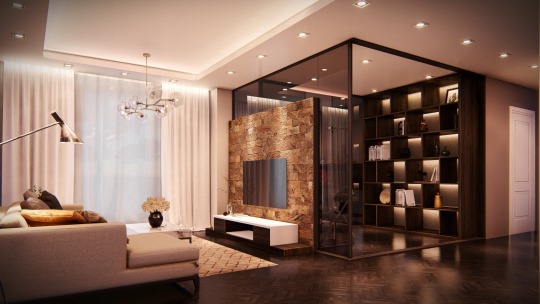
Lastly, by integrating ambient lighting and mood in your scene, you can suggest an intended feeling for your audience.
For instance, you can achieve the soothing and romantic atmosphere in a living room by using a combination of spotlights and area lights. Also, since shadows play an important role in realism, make sure to modify your shadows accordingly.

Internal render of a city apartment by Derek Weigall
Some other helpful tips for interior lighting include:
- Use natural material colors (not too saturated and not too close to black or white) for more accurate and consistent light reflections on surfaces.
- Divide your interior scene into different areas that have different qualities of light for more engaging lighting.
- When determining the light settings, consider isolating a single light (or multiple lights) so that you know exactly how it contributes to the lighting and shadows in the scene.
Through controlled use of light, together with beautiful materials, you can develop a stylish ambiance that gives the interior scene its geometry as well as its liveliness and flavor.
Creating “Beauty,” Mastering Materials and Detail
The materials, textures and objects in your interior render are just as important as your lighting strategy. If you’re aiming for photorealism, then you must emphasize the quality and the realism of your materials, such as your floors, walls and ceilings. In general, try to aim for a material or texture that’s so realistic, you can easily imagine how it would feel.
The following interior render is effective because it uses materials and textures that you’ve felt before. You can imagine the cragged stone wall on your fingers. For the wood-like floor, you may have felt something similar under your bare feet. These are materials and textures, realistically reproduced, that strike at your viewer’s memory and bring his/her senses into the interior space.

Although high-quality textures and materials are essential for a beautiful interior, you still need to consider how the materials interact with each other, as well as the lighting profile. Remember, balance is everything.

Having a library of high-quality materials at your fingertips, when building your scene, makes it easier (and faster) to find the details and authenticity that you are searching for. For example, there’s a huge library of materials in Lumion, each of which is tweakable for gloss, reflectivity and suchlike. The newest update, Lumion 7.5, also includes a lot of new HD materials in its library.

High-quality materials are essential, but they must look as if they are in an existing, real-life space. Paying attention to the details in your scene will help promote realism and reduce the impression that you are creating a computer generated image.
For instance, imperfections make an interior render look “lived in.” Pillows, rugs, curtains, blankets and other objects should never be flat. They should have natural creases and ruffles. One of the best ways of achieving photorealism in your renders is to analyze real photographs and train your eye to notice these small details.
What are some of the small details in this render?

One reason why this bedroom looks realistic and authentic is the scale and size of the objects placed around the room. Scale is often overlooked in 3D renders, and it relates to how big objects are in comparison to the rest of your scene.

To master your use of materials, think about a character who occupies the interior space. By integrating the fictional character’s life and personality into the interior, you will also give the render some personality.
And if the interior render has no personality, you might as well ask, “What’s the point?”
The Photographic Approach to Render Composition
When you walk into a room or look at a photograph of a home’s interior, ask yourself, “Why do I feel the way I do?” Aside from light and materials, it’s your perspective and your viewing angle that heightens or diminishes the feeling you have towards the interior space.
The location and the angle of your viewpoint emphasize certain elements within the scene. This emphasis lets you control the intended mood of the scene as well.
Another good rule is to simplify the scene. Often, the simpler the shot, the bigger the impact. Through the use of depth of field in the following image, the focus of the scene is the red flower.

Take away the depth of field and the camera’s focus on the flower, and you have a much different image.

The lines in your render are also crucial. By using a two-point perspective to straighten the lines, you can create a more realistic representation of 3D forms on a 2D surface.

Above is an interior render with two-point perspective. The same image is also featured below without two-point perspective.

Lines are also incredibly effective at guiding the viewer’s eyes to encourage an intended mood. In other words, don’t let the viewer drift aimlessly around the image. Suggest a focal point.
The following render demonstrates the impact that lines can have. When you first glance at the following image, pay attention to where the image leads your eyes.

The composition of your interior render doesn’t have to be complicated. The “rule of thirds” and the “golden mean” are, certainly, important theories to follow, but always remember:
Being a stickler for rules can produce dull renders that lack any type of spontaneity. This innovative take on a classic living room (below) was created with a simple fish eye effect.

Also, what works for one render doesn’t necessarily work for another. The key takeaway is that the camera angle, frame, focal length and positioning will affect the way that people perceive your renders.
Bring Your Interior Renders to Life
A beautiful interior render doesn’t solely come from your 3D model. Instead, it’s built with a keen attention to detail, style and mood. It’s the sense of 3D space on a 2D image, captured effectively and accurately.

Most importantly, however, a beautiful render comes from an appreciation of a few principles and a lot of practice.
Luckily, there are tools that allow you to hone the craft of creating beautiful renders and to practice without pain, even for those with limited time available to learn. Visit Lumion.hk to learn more.
*All images were created in Lumion 7.
#Lumion