Lumion BLOG
Feel the space with Lumion
3 Tips for Rendering Context for Landscape Architects and Urban Planners
TweetShareShareShareOne of the challenges in landscape architecture and urban planning is rendering the project’s context. From planting large amounts of trees to showing the bustle of traffic or people in a city, context creation is often seen as an essential, yet time-consuming task.
So, what’s the secret to complex, perhaps large-scale, exterior renders that look real and feel alive? Hint: it’s not excessive copy-pasting or time-consuming single object placement. Bridging efficiency with the intricacies of exterior settings requires a different approach.
Rendering a complete and beautiful exterior scene shouldn’t be a luxury. We think it should be easy, and accessible. In this post, you’ll find out how techniques such as context downloading with OpenStreetMap, Mass Placement and Mass Move can help you easily create an effective render packed with accurate and real-looking context.
Tip #1: Use OpenStreetMap to Instantly Create Massive Scenes
The firm’s project is for a recreational area near a city center. The design concept is ready and you’ve 3D modeled it, but you just heard that you need to present an unscheduled update on the project to the client, tomorrow! At this point, you may be short on options. For instance:
- Option A is to show your design without including any city context around it.
- Option B is to present your concept in a real-looking representation of the city complete with data regarding buildings, streets, parks and so on. If only you could make the city come right out of the ground…

Through Lumion’s OpenStreetMap integration (above), you can download the city and mapping data of many locations on Earth and then import this context right into Lumion. This gives you the ability to fill in the horizon for aerial shots, or simply to provide a backdrop for eye-level camera angles.
After importing the context, it’s easy to upload a 3D model and place it anywhere in the city. If there is another structure in the way, simply drag your project over the current structure and your model will replace the OpenStreetMap building. You can also alter the color scheme of the imported city and use various weather effects to create a sophisticated backdrop for your project’s render.
For more information, this context import tutorial by Michael Brightman discusses how to download OpenStreetMap data and then use the generated context to create a beautiful and all-inclusive render.
Tip #2: Build Context Fast With Mass Placement
Mass Placement is a widely used tool for quickly adding several objects, whether it’s a handful of cars or a line of trees. And it’s as easy as…well…drawing a line.

Although you can add the same object (or different objects) multiple times with just a few clicks, there is still variation among the objects for a more genuine look and feel. The above animation, for instance, shows a diversity of trees with varying height, color and distance from one tree to the next.
Through several sliders (which you can briefly see at the end of the above gif), you can also assign:
- The number of items placed on the Mass Placement line
- The direction of the individual objects as well as the direction of the collective objects
- The spacing between objects
- Whether the objects are placed on the line or offset
And mass placement isn’t solely used for trees or landscape architecture. It can be useful for urban planning as well. Some other time-saving mass placement options include:
- Creating crowds of people
- Quickly developing traffic
- Planting a forest
- Creating a line of buildings for an instant neighborhood
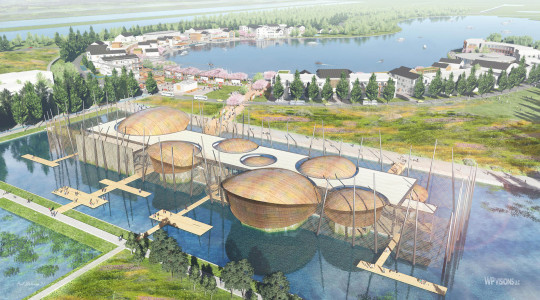
The following render, for instance, shows how a combination of Mass Placement techniques can provide context and demonstrate a project’s blend of science and art.

Tip #3: Make Your Cities and Towns Move
There is just as much gusto in the fast bustle of cities as there is in the leisurely stroll of small towns and villages. By re-creating movement in your project’s 3D render, the final result not only captures this energy, but it also heightens interest and provides an in-depth look into how the project interacts with the environment.

Still images, such as the one above, can show the fast-paced movement of traffic through the use of red or white lines. In a video, however, emulating traffic with lines just won’t cut it. You actually need your traffic and people to move about.
Animating a 3D scene may sound intimidating, but it can be straightforward and intuitive through tools such as the Mass Move tool in Lumion. With a little practice, you can start applying Mass Move in more complex and advanced ways, mimicking the ways that cities and people move in real life.

From the multiple lanes of traffic to the camera panning across the scene, what was once a simple shot of a roundabout has become a bustling intersection that looks and feels alive.
The best part of this roundabout animation, however, is that it isn’t too difficult to make, and you can add multiple movement paths that encompass several objects. You can also determine the object’s speed and direction, and for a smoother result, you can soften the pathway curves so objects move nicely around a 360-degree object.
And it’s not just traffic you can move….
A video with this level of complex motion does require practice to get everything moving just right. If you’re just starting out with Mass Move and 3D architectural animations, some tips for getting a clean, attractive look include:
- When adding the mass move pathways, select the appropriate objects and hide them in a layer. This way, you can clearly see the pathways and make adjustments accordingly.
- Make the cars and/or people move in different directions and at different speeds. Don’t have EVERYONE moving at the same speed or going in the same direction. This isn’t 1984.
- Pay attention to cars/people walking into other objects. Car accidents can happen, people can scrape their bodies against walls, etc. Also, look out for items caught up in the mass move pathways. Nothing kills realism faster than a traffic cone traveling down the highway at 30mph.

There’s no single correct way to render an outdoor exterior, as any number of factors contribute to the scene’s realism, authenticity, and/or artistic appeal.
Nevertheless, when you’re asked to create a large, complex scene complete with hundreds of trees or busy traffic and bustling pedestrians, you’ll find there’s no need to panic. Visit Lumion.hk to learn more.
#Lumion