Lumion BLOG
Feel the space with Lumion
Feature Spotlight: How the Styles button can help you render faster than ever
TweetShareShareShareWe’ll explore how to make this render with only the Interior Style effect and a little optimization.
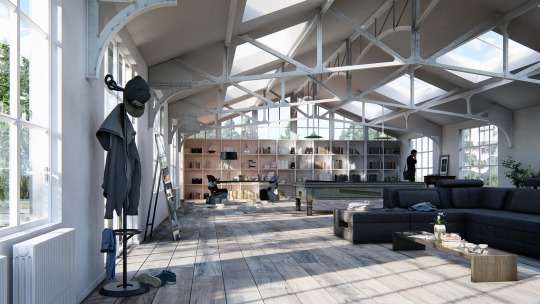
Final interior render, created in Lumion 8 with the Styles button and minimal render enhancement.
You’ve been there before: a deadline is looming and you need to render, fast.
Your architectural vision needs to look amazing and professional, not something cobbled together in a hurry.
Lumion 8 helps you capture your design in the best light possible and render faster than ever. By applying only the Interior Style, which includes the Sky Light effect and the Soft and Fine Shadows, we were able to go from a model like this…

…To something a little more beautiful and dynamic…

Interior scene with only the Interior Style applied.
In this post, you’ll discover how using the Styles button can help you take your rendering experience and quality to a whole new level.
Use the Styles button to save time and build the core of an elegant render
Prior to Lumion 8, our developers were busy creating new technologies with the goal of augmenting Lumion’s render quality. Out of this development came the Sky Light and the Soft and Fine Shadow features.
But like Mies van der Rohe’s “Less is More,” we wanted to bring together all of the power of Lumion 8 in a single function — hence, the Styles button.

The Styles button
It looks unassuming, but there’s a lot of power underneath this button. Once you dress up your 3D model with Lumion materials and objects, add reflection planes and tinker with the sun direction (if applicable), just push the Styles button and select one of eight styles, including the following:

Eight styles to suit various scenes and rendering goals.
In an instant, your design transforms into a beautiful render with a carefully balanced effects combination.

For this post’s interior render, you can see a list of effects on the left-hand side of your screen, including:

Interior Style effect stack.
The Styles button gives you a near-complete backbone for outstanding depth and realism, and it serves as a launching point so that you can personalize the render with your own style in minutes and create a look that’s all your own.
Move the sun around and add reflection planes
The Styles button does quite a bit, but not everything. For instance, the Interior Style doesn’t designate the height, positioning and brightness of the sun. Depending on your model, you may also need to add reflection planes and two-point perspective.
By tweaking the Sun effect, you can alter the direction and length of the shadows and you can temper the scene’s brightness.
By changing the sun direction, we can influence the impact that the light and shadows will have on the final result.
Personalize the interior render in the shortest amount of time possible
The Styles button instantly builds an effect stack and balances multiple effects, giving you a result that’s clean and optimized for a professional result.
Yet, when going beyond the cookie-cutter image or video, the Styles button helps save time by building the core of your render, and allowing you to easily make quick modifications.
Looking back at the interior render, the Interior Style initially looked like this:

The lighting is nice and the render is visually engaging, but that yellow tint just has to go. Personally, we want stronger shadows cast across the ceiling, contrasting the white paint and making the colors “pop.”
With a few adjustments, the resulting render transformed into this:

How’d we do it quick and easy by using the Styles button?
Fortunately, the Interior Style already built the effect stack and pre-balanced many of the effects for a great result. Further modifications included adding a few effects and toggling others.
The modifications included:
- Turning off Exposure
- Removing Depth of Field
- Adding the Sun effect, including the Sun Height at 0.3, the Sun Heading at 0.2, the Sun Brightness at 0.7 and the Sun Disk Size at 0
- Adjusting the Sharpen from 0 to 0.3
- Adding the Analog Color Lab, including setting the Style slider to 1.7 and setting the Amount slider to 0.2
- Adding the Noise effect with the Intensity set at 0.1, Color at 0 and Size at 1
- Adjusting the Color Correction, including moving the Temperature slider to 0.2, Tint to 0.0, changing the Brightness to 0.5 and dialing up the Contrast to 0.7
- Toggling Hyperlight from 35 to 41 (you will only see this change in the resulting render)
- Enhancing the Sky Light from 1 to 1.4
- Adjusting the Shadow effect, including raising the Sun Shadow Range to 4000m, turning up the Color to 1.6, setting the Interior / Exterior to 0.9, moving the omnishadow slider all the way up and setting the Shadow Correction to 0.
As always, make sure to turn on 2-point perspective, add Global Illumination where needed and designate Reflections on appropriate materials.
Watch the video below to see how we went from blank model to beautiful render.
Using the Styles effect for your scene
Below are the eight different Styles showing scenes enhanced only with the Styles effect, 2-point perspective and reflection planes.
Realistic

Interior

Dawn

Daytime

Night

Overcast

Color Sketch

Watercolor

Get Lumion 8 and start rendering faster than ever
A week since the launch of Lumion 8, the response from architects and designers around the world has been amazing. Explore what Lumion 8 is all about and discover the new features at What’s New.
In the coming weeks, we will continue posting about Lumion 8 features and functionalities, so stay tuned!
#Lumion