Lumion BLOG
Feel the space with Lumion
Beautiful Renders within Reach
TweetShareShareShareWhat makes this render beautiful?

- Objective Answer — This render is beautiful because of its light, materials, composition and technical quality.
- Realistic Answer — The question is like asking what makes a delicious meal or a sad song. Every 3D render is nuanced in its beauty (or lack thereof) and what’s considered “beautiful” between one architect and another can vary, sometimes dramatically.
Some architects and designers are immediately drawn to the sheer attractiveness of the image. They see the pagoda engulfed in a peaceful, late-afternoon light on what seems to be a brisk, lovely evening. Others see the realism of the image, defining the render’s beauty by its aged stone, the wood reflecting the soft natural light, or, perhaps most vividly, the transparent curtains flowing gently in the wind, a feature that’s actually pretty easy to implement.
Despite differing opinions on what makes an attractive image, one thing’s clear: a beautiful render is like an iceberg. Above the surface, you have a stunning 3D image from a specific viewpoint that highlights the beauty and the story that the render tells. The bulk of the iceberg below the surface holds the elements of beauty that you’ve put into the render, ranging from things like materials and light to the emphasis and/or subtlety associated with each element.
So, the question isn’t “what makes a beautiful render?” Instead, it’s how do I go from this…


As an architect, you understand what’s needed to capture a vision, communicate its intent and mimic the sense of realism that’s often vital in this field. Here are a few easy considerations that put beautiful renders within your reach.
The Importance of Realistic Lighting
Look around you and pay close attention to the tiny changes of light. Objects simultaneously reflect light and create shadows, combinations of interior and exterior light enable unique tones and shades, and small differences in light color can have a huge effect on the room’s mood.
Indoor or outdoor, natural or artificial, creating stylish, realistic lighting is one of the core elements of a quality, beautiful render. Often, when you have realistic lighting in your render, the viewer recognizes the type of lighting and associates an emotion or feeling with the spaces they see.

In this stylish meeting room*, for instance, the warm interior lights are responding realistically and consistently off the conference table. Those strong reflections on the table give a sense of sophistication, perfect for board meetings and other corporate events. This scene also implements area lights and spotlights along with beautiful materials (refer to the red couch), which adds both style and ambiance.
Lighting must be fluid, yet precise. It must interact with objects, materials and buildings to give realistic context, such as in this tribute to Mies van der Rohe (by Kristijan Tavcar).

Getting Your Materials to Look Just Right
Next to customizing the lighting settings for your 3D render, it’s also essential to get your materials to look just right. Fortunately, creating convincing and realistic materials and object surfaces can be quite easy, and it has a massive impact.

For instance, look at the surface of the pool beneath the pagoda. Not only does the water surface accurately reflect the wavy curtains, but ripples in the water distort this reflection. With regards to the translucent, flowing curtains, you can also see that the curtain materials have absorbed the warm light of the evening sun.
Remember, your materials are part of the scene and must be adjusted accordingly to reflect this. In this Spanish home, the wall materials together with vines crawling upwards clearly convey that this is an older building.

Look a little closer and a rusty, weathered fence emphasizes the visible effects that time has on objects and materials.

Lastly, consider leveraging the age and the imperfections of your materials to tell a story. Imagine how the next image would look if the bed sheets were flat, tucked in, and perfect.

It’s those subtle ripples that turn this render from a 3D computer graphics scene into a work of beauty.
Adding Context to Create Dramatic Scenes
In both real-life and 3D renders, buildings and objects don’t exist in a vacuum. Instead, they are (or represent) real environments. Beautiful renders capitalize on photo-realism in the scene’s context to bring a sense of “feeling” to the main focus of the render, whether that’s an office building, a residential home, or anything else.
Take away the people from the following render and you lose a sense of the bustling corporate energy surrounding the office complex.

Trees and outdoor elements are also crucial to the style, mood and overall story within a beautiful render.

The focus of this render is definitely the beehive villa, but it’s the placement and diversity of the shrubs and trees, as well as the wet asphalt, that give the villa a real-life environment you can feel, smell and hear.
Choosing a Viewpoint
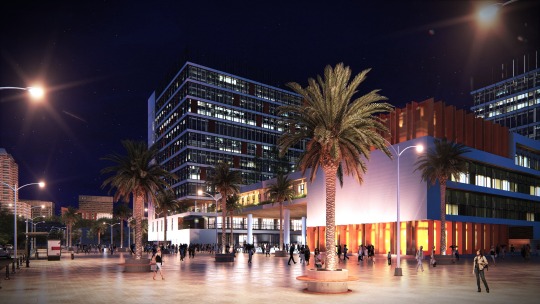
The point-of-view (camera position) you choose in a 3D render, like in photography, has as much of an effect as lighting, context, and materials. The viewpoint of your rendered image, or the videography used in videos, is the invitation you’re offering others to analyze your scene. For architects and designers, their composition depends on the viewpoint, and it is this viewpoint that tells the story of the project.

In the image above, there are palm trees and the sun in the focal point. The linear geometry of the buildings and their reflective surfaces, although attractive on their own, draw the viewer’s eyes to this palm tree. And what you have is a story of tropics, warm weather, sandy beaches and luxuriously modernist properties.
When rendering, ask yourself, “What is the story being told here?”
“How does the viewpoint help tell this story?”

Creating beautiful renders means having complete control of your perspectives, allowing you to find an ideal shot that perfectly captures the story you’re trying to tell. It is also incorporating the composition rules of photography, such as showing a scene from eye-level, following the rule of thirds and so on.
A little risk in your viewpoint can produce amazing 3D renders, but some can find creative camera angles to either be incredible or completely disorienting. That’s a judgment call.

To start creating beautiful renders, you don’t have to be a creative whiz with a superb eye; these technical qualities can be studied, worked on and improved.
Download a free trial of Lumion and see for yourself how cool and easy it is to start making your best and most beautiful 3D renders yet. In the coming weeks, we’ll also be exploring the topic of making beautiful renders and the techniques you can employ in creating them. Make sure to check back for discussions about using live previews of your models, creating context and landscape in your renders and more.
*All images were created with Lumion 7.
Want to know how to create a render like this?
TweetShareShareShareThe render shown below was created wholly in Lumion 7.3. This blog shows you which effects were combined to create this beautiful image. As a bonus, a couple of other renders have been included too.
The scene was built in the same way as described in a previous blog; the broad steps being:
- Import the basic 3D model (for example a SketchUp or Revit model)
- Add objects like trees and people
- Add materials from the Lumion library and adjust them
- Add lights - spot lights, line lights and area lights
- A viewpoint in the Lumion project has been carefully chosen
Having built the basic scene, the key ingredients that need to be added are the effects. The effects ‘stack’ applied in Lumion’s photo mode to create this scene is listed below. The effects were applied in the list order.
- 2-Point Perspective: Switch it on.
- Sun: It’s an evening scene, so change sun height and tweak other settings.
- Shadow: Push up the shadow coloring and brightness sliders and put the omnishadow slider full on.
- Global Illumination: Reduce the sun amount and fall-off speed sliders
- Reflection: Switch on Speedray reflections. 9 reflection planes have also been added.
- Cloud: Adjust cloud sliders until position, amount and form look right
- Analog Color Lab: Style slider on 60% and amount slider on 25%
- Chromatic Aberrations: Dispersion slider 5%, Affected area slider 100%, no safe shadows.
- Volume Clouds: Low amount, high height, softness and brightness. Tweak position.
- Color Correction: Move the sliders to emphasise blue shift and reduce red shift.
- Noise: Adjust sliders for very low intensity, no color, 100% size.
- Vignette: Adjust sliders for a small amount and high softness.
- Lens Flare: Always a question of tweaking to get this looking right for each image. Streak details and master brightness are important.
- Fog: In this case the fog brightness has been increased, fog density around 40% and fall off around 25%.
- Sharpness: Intensity set at close to zero
The action of applying effects in Lumion is simple and tweaking them is easy too. But every image needs some attention to detail and the effects for every image will always need a little tweaking.
Visualizing how you want to convey your design is often the hard part as it requires artistic attention to detail. Visualize in your mind’s eye the result you are working towards and then practice getting there using the Lumion effects.

Above: A variation of the same scene. The effects are more or less the same, it’s just a different time of day!
Creating this variation was made easy by copy-pasting the effects stack from the first and tweaking the sliders to get the scene to look a bit different. This technique will save you loads of time. Here are some other images of the same model, shown from different viewpoints in the total Lumion scene, and using different effects settings.

…. and another one!

For more information and advice about getting better and faster results, visit the online Lumion Support Center. You can also log in using your license information and access the private forum to get discover how to get more out of Lumion.
It’s Curtains!
TweetShareShareShareTransparent or translucent materials add style through texture, especially in the form of curtains. Lumion 7 comes with curtain presets in its materials library. You can also add variable amounts of transparency or translucency, to achieve spectacular results with the bonus that it’s simple to do.
This blog explains how to apply these materials properties and shows some beautiful examples, all made in Lumion 7, of what you can achieve with just a little light, love and imagination.

Above: Curtains on a pergola, blowing in the wind

Above: A stylish bedroom, with a lot of transparent fabrics

Above: Spectacular poolside in the foothills of snow-capped mountains!

Above: A beautiful render of a simple and stylish bedroom.
Adding curtain presets in Lumion 7 is easy. The tutorial below shows you how.
Above: Tutorial showing how to apply Curtain presets
Transparency and translucency can be adjusted independently in Lumion 7.
Transparency means that light travels through a material without an interaction taking place between the light and the material. The amount of light that passes through the material depends on how transparent (or opaque) the material is.
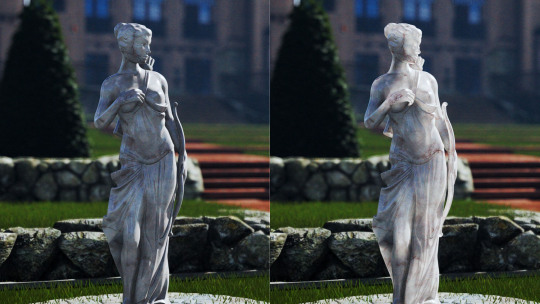
Above: Translucency (waxiness) applied to a marble statue
Translucency, on the other hand, means that light travels partially through a material and interacts with it in such a way that the material itself appears to look more or less “waxy”.
In Lumion 7 you therefore have two sliders: A ‘transparency’ slider and a ‘waxiness’ slider. The tutorial below shows you how to use these.
Above: Tutorial showing how to apply transparency and translucency (waxiness)

Above: A blustery day with butterflies in the garden!
For more about applying materials in Lumion click here. To read more about the materials features in Lumion 7.3, visit the Lumion what’s new page.
Shadowy Figures
TweetShareShareSharePeople in renders can be tricky. They shouldn’t be shouting “look at me!” but their presence does add a certain vivacity to a scene. Silhouettes are often the way to go to strike this sweet-spot between presence and over-presence.

Above: Silhouettes add atmosphere and demonstrate function without detracting from the main design message
Check out the tutorial below to find out how easy it is to add black or white silhouettes to your Lumion scene.
In case you’d like to learn more Lumion techniques, you can find around 200 videos via the tutorial page on the Lumion website.
Rendering Beautiful Interiors
TweetShareShareShareHigh demands are placed on interior renders. Lighting is crucial. Entourage too. When it comes to rendering interiors, details matter!
As Lumion has improved over recent years, its users have risen to the interior challenge. Check out these examples of Lumion enthusiasts who clearly demonstrate the mesmerizing beauty achievable with just a little
diligence and Lumion love.
And remember! All of these images took seconds (not hours) of waiting time for the final render.

Above: Image by a member of the Lumion team. Great use of line lights, area lights and spotlights. Together with beautiful materials like the wooden floor, the curtains and the airy color scheme create a warm and stylish ambience.

Above: Image by G.Felix. A bedroom with a calm mood and exuding style. Focus here is again on lighting, coloring and getting the materials looking great.

Above: Interior image by G.Giovanni. The lighting, reflections and materials choices provide realism.

Above: Image by G.Felix. Inviting mood created with sunlight streaming in through the window on the right. Notice the carefully placed spotlights, subtle reflections off the wooden floor, real-to-life layout of the stylish chairs and appealing materials choices. The whole scene has been finely tweaked for a stylish and atmospheric render.


Above: A stylish modern, open office. Depth-of-field, reflections and the combination of industrial design and classy materials lead to this great looking image. The coffee vapor was added in Lumion by importing a transparent texture - it’s a nice detail!

Above: Image by G.Felix. A small restaurant in a boutique hotel. Once again, a great design, beautiful lighting, carefully-tweaked materials and reflections combine to provide a stylish and inviting space.
If you want to see more examples of Lumion interior renders, then check out the Lumion forum. If you already own a Lumion license, then you can log on to the private section of the forum and access discussions and expertise to help you achieve this kind of beautiful interior render.
#Lumion