Lumion BLOG
Feel the space with Lumion
Weathered and Aged Materials in Lumion 7
TweetShareShareShareUntil now, making material look weathered or aged required an artist to paint textures by hand. Lumion 7 makes this painstaking process a relic of the past. Now, you can create imperfections, impart authenticity, and age materials with a simple click of the mouse.
Remove the look and feel of computer graphics by adding rust to steel, wear and tear on wood, or dirt and moss on stones. The resulting realism makes materials look like they’ve always been there, adding an aesthetically appealing depth of authenticity.
This blog shows some of the things you can do with the impressive new weathering feature in Lumion.

Above: Fence rendered in Lumion 7 with rusting (aged iron) added.
You can use it on almost any material to impart a sense of authenticity to it. Fake things suddenly seem real. Materials with a CG look become believable.

Above: Subtle use of ageing (weathering effect ) applied to leather sofa

Above: Extreme ageing (weathering effect ) applied to the same leather sofa model, with different coloring
The tutorial below demonstrates how easy it is to adjust the weathering settings and produce striking changes to the materials.
Above: Tutorial explaining how to adjust weathering settings
There are two main ways to apply weathering and ageing in Lumion. The above tutorial shows how to use the weathering slider under the weathering tab in the materials editor.

Above: Ageing effect on stone statue
The second way to apply the weathering effect is even simpler than the first. Just choose from one of the presets in the Aged category under the Nature tab in the materials editor. The tutorial below shows you how to find and use this.
Above: Tutorial explains Aged material presets
The image below shows the weathering effect applied to a wooden table. You can achieve this easily, either using an aged wood preset or by applying a dark wood material to the table and then adjsting the weathering slider. The aged effect imparts a new quality to the material and makes the table look like it belongs where it is. It also removes the CG feel of the table, making it look more authentic and believable.

For more information about Lumion 7 features read more here.
10 Tips for making a great movie in Lumion
TweetShareShareShareMaking a movie in Lumion is not a big challenge, as the basic tutorials on the Lumion website show. But how do you make a really great movie?
The two people in the Lumion team who make the Lumion promo films have compiled their top 10 tips, which fall into 3 broad categories:
- Camera work and movie structure
- Artistic effects
- Attention to detail
Above: Film by 3D Cordoba, shows almost all of the features of an excellent Lumion film
Camera work and movie structure
1. Use slow camera movements
Allow the viewer to get a good look at what you are trying to show by slowing down the camera movements. Move past the objects you want to show closely enough and slowly enough that they can be appreciated. Simply taking two shots very close to each other in Lumion to make a single clip can be very effective.
2. Use multiple clips
Make short clips instead of one long movie, each one starting and finishing at carefully chosen points in your model. This allows you to show more of your model and to focus on the point you want to emphasize. Structure the clips in a sequence that tells the story you want to tell. Avoid making long complicated fly-throughs in one long clip. This almost never works. It’s better to make choices.
3. Move camera in one direction in each clip
Move the camera in a single direction in each clip. This lets the viewer appreciate what they are seeing. Whether the camera moves up, down or around the design is a choice that’s up to you. But whichever direction you choose for each clip, a deliberate, single-direction, slow movement is usually the way to go. The camera direction in adjacent clips should flow naturally and when done right can create a ‘wow’ effect. Sudden direction changes don’t usually work.
Above: Film by Shinsaku Hidaka, winner of the 2015 Lumion Japan Competition. The focus here is using techniques for artistic purposes.
Artistic effects
4. Use animated effects … carefully
Use animations like cloud or sun position, to achieve a beautiful sky, a sunset effect or shadows that sweep across surfaces. These create great visual effects but they need to be slow, otherwise they will distract attention away from the design itself.
5. Use volume lighting and lens flare … carefully!
Lighting is always important. Great scenes in Lumion usually have good lighting. Sometimes volume lighting works but needs to be used very subtley. Adding the lens-flare effect is an equally nice artistic touch but be sure to avoid big blobs of light on the screen… unless that is specifically what you are looking for!
6. Use the analogue color lab or color correction
The analogue color lab or the color correction effect in Lumion. These provide a palette to give your movie its own individual color tone, which can be quite persuasive in creating a particular mood. It also works well in subtle combination with the vignette effect.
Above: Movie by Kristijan Tavcar shows creative use of Lumion’s effects like animated depth-of-field and animated sun for sweeping shadows
Attention to detail
7. Use a little bit of motion blur
Motion blur as the curious effect of tricking your brain into believing that a movie has a higher frame rate than the real frame rate. This means that small amounts of motion blur makes your movies more comfortable to watch.
8. Fade in and fade-out for main movie and between clips
It’s important to think about the beginning and end of your movie, as well transitions between clips. Careful choice of fade-in/out transitions can be very helpful with this.
Above: IKM animation of Pittsburgh ballet theatre shows great use of camera work, music and Lumion effects.
9. Pick the right music and sound effects
Music matters. It sets the mood. Be sure to pick music which fits the story that you want to tell. Get the timing of your music to match changes in the imagery of the animation, in this way, the images and music work together to emphasize impact. Sound effects from within Lumion like tweeting birds, traffic on roads or people chatting can be added as objects in your scene too.
10. Reflections
Reflections are crucial. Use Speedray reflections always and use reflection planes on selected important surfaces. Reflection planes need to be used sparingly because they use a lot of computer resources and rendering takes longer. They produce very accurate reflections, which are very important for mirrors, glass and large water surfaces. Speedray reflections can be turned on always because they are less demanding of your computer and don’t have a large effect on render time.
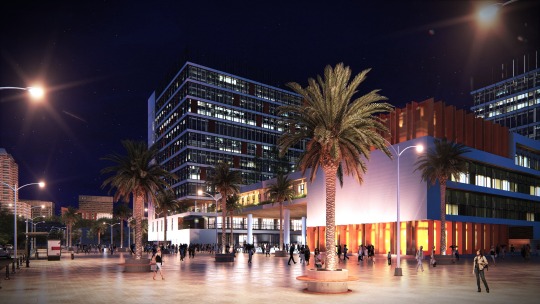
Above: Moscow high-rise complex by Sergey Skuratov Architects showing excellent reflections, camera work and well-timed/well-suited music
If you didn’t get a chance to do so, look at each of the excellent films above taken from the Lumion showcase and made by customers of Lumion. Look critically at them and you’ll see a lot of the themes mentioned of above. You’ll also notice the artistic flair that comes with talent …. and practice!
Read more… ‘5 Tips to improve still image renders from Lumion’
Tip: 5 Steps to great renders from Lumion
TweetShareShareShareYour 3D model is ready, you’ve imported it into Lumion and now you want to make it look great. All Lumion’s functionality is invitingly at your fingertips but what next? This blog gives you step-by-step hints of what to do.

Lumion is intuitive and the functionality is easy to apply but what do you want to communicate artistically and how do you achieve that in Lumion?
Building an artistically compelling still image or animation in Lumion requires a vision of what you want to achieve: What emotions do you want to convey? Are you going for light & colorful, grey & bleak or something else? Should the images look realistic or sketchy? Which parts of the building are you trying to emphasize?
Here are 5 tips, including extra hints, from Alexander of the Lumion team. He plays a leading artistic role in creating Lumion promo videos as well as in programming Lumion. It’s fair to say he has a special flair for making compelling images and animations.
1. Find the best point (or points) of view in your scene
- Still shots should be balanced by at least one composition rule. There are many rules you can use but the more the better.
- The camera height should for much of the time during an animation, be set at human eye level. The camera angle shouldn’t be too wide so as to avoid perspective distortion.

2. Set up the lighting
- Find the best position for the sun to attract maximum attention to the parts of the building that you want to highlight. Use the sun study effect, if you want to accurately simulate the sun location at a particular location, time and date.
- Add Interior and mood lighting, even if it is a day shot, this communicates in a subtle way that the building is being used. You can also use volumetric lighting for extra atmosphere.
- Balance the shadow brightness and coloring depending on situation, in outdoor shadows always a bit more blue.
- Avoid high contrast in non-important areas otherwise these high contrast areas can sometimes direct attention to the wrong points in your design.

3. Make your materials look good
- Always enable SpeedRay reflections and put reflection planes on big flat surfaces.
- Glossiness of the floor and ceiling always should be tweaked after applying materials, more often extra reflectivity is better than less reflectivity.
- Do not use simple digital colors, like plain green, red, blue, purple, yellow. It looks ugly and it’s always better to find natural, more realistic, “flat” colors.
- Sometimes it is better to replace diffuse texture with plain color (using top slider in material editor) and also use bumps but without maximal intensity.

4. Adding effects
- Use color correction, especially the first slider, as it adds dark shadows where necessary.
- Add a little bit of chromatic aberration and a very tiny value of fish-eye for a small optical imperfection.
- Add Hyperlight for still images. When doing this use an intensity higher than 100%.
- To make the picture a bit ‘flat’ like print on paper, use the sharpness effect and put the slider on minimum, sometimes it helps.
- Depth-of-Field (DOF) is really useful for narrow camera angles, but better to not use it with the wide ones.
- Always put reflection on water.

5. Extra details - every single shot needs it!
- Furniture, for interiors and exteriors is very important. Select and add objects from the Lumion object library. Place some in empty spaces.
- Cars are good for border areas of a picture. Try to avoid having cars in the center of the composition.
- People are important but try to place them such that they do not dominate the picture. Their faces should not be too visible. Using silhouettes from the library is a good way to achieve neutrality.
- Trees and plants are very good for picture borders and background.
- The background is super important, even if it’s blurred, the feeling of a real city or forest adds a lot to the feeling of a real building. For example birds can be a nice detail to make the sky look more natural.
- Try using blurred clouds (softness slider), or disable cloud completely, clear sky is very good if you need extra attention on the building itself.

Want to know how to create a render like this?
TweetShareShareShareThe render shown below was created wholly in Lumion 7.3. This blog shows you which effects were combined to create this beautiful image. As a bonus, a couple of other renders have been included too.
The scene was built in the same way as described in a previous blog; the broad steps being:
- Import the basic 3D model (for example a SketchUp or Revit model)
- Add objects like trees and people
- Add materials from the Lumion library and adjust them
- Add lights - spot lights, line lights and area lights
- A viewpoint in the Lumion project has been carefully chosen
Having built the basic scene, the key ingredients that need to be added are the effects. The effects ‘stack’ applied in Lumion’s photo mode to create this scene is listed below. The effects were applied in the list order.
- 2-Point Perspective: Switch it on.
- Sun: It’s an evening scene, so change sun height and tweak other settings.
- Shadow: Push up the shadow coloring and brightness sliders and put the omnishadow slider full on.
- Global Illumination: Reduce the sun amount and fall-off speed sliders
- Reflection: Switch on Speedray reflections. 9 reflection planes have also been added.
- Cloud: Adjust cloud sliders until position, amount and form look right
- Analog Color Lab: Style slider on 60% and amount slider on 25%
- Chromatic Aberrations: Dispersion slider 5%, Affected area slider 100%, no safe shadows.
- Volume Clouds: Low amount, high height, softness and brightness. Tweak position.
- Color Correction: Move the sliders to emphasise blue shift and reduce red shift.
- Noise: Adjust sliders for very low intensity, no color, 100% size.
- Vignette: Adjust sliders for a small amount and high softness.
- Lens Flare: Always a question of tweaking to get this looking right for each image. Streak details and master brightness are important.
- Fog: In this case the fog brightness has been increased, fog density around 40% and fall off around 25%.
- Sharpness: Intensity set at close to zero
The action of applying effects in Lumion is simple and tweaking them is easy too. But every image needs some attention to detail and the effects for every image will always need a little tweaking.
Visualizing how you want to convey your design is often the hard part as it requires artistic attention to detail. Visualize in your mind’s eye the result you are working towards and then practice getting there using the Lumion effects.

Above: A variation of the same scene. The effects are more or less the same, it’s just a different time of day!
Creating this variation was made easy by copy-pasting the effects stack from the first and tweaking the sliders to get the scene to look a bit different. This technique will save you loads of time. Here are some other images of the same model, shown from different viewpoints in the total Lumion scene, and using different effects settings.

…. and another one!

For more information and advice about getting better and faster results, visit the online Lumion Support Center. You can also log in using your license information and access the private forum to get discover how to get more out of Lumion.
Tip: Blast off your Lumion performance
TweetShareShareShareAs an Architect or Designer you know that time is often critical in getting your latest design to the client. Here are a few tips to make your Lumion experience even faster.
1) How fast is your hardware?
You can benchmark your computer in Lumion to check how fast it will perform. The tutorial below shows you how to do the benchmark in Lumion.
2) What if your graphics card score is low?
If your graphics card scores in the orange or red zones, then it may not be powerful enough to get a great performance in Lumion. A high end graphics card is really important and if yours turns out to be in the orange or red zones, then we strongly recommend upgrading. The NVidia Geforce series has the highest price/performance ratio. We put together some tips regarding what Lumion requires in terms of graphics hardware, as well as tips to choose the right hardware for Lumion.
If you are sure you have a fast laptop but your benchmark score turns out to be low, make sure that Lumion is using the right graphics card, as sometimes there are two available.
3) Tips to optimize rendering speed
Render times in Lumion are primarily affected by just a few factors. This link explains how to optimize speed in Lumion by using some effects and options with care.
4) Optimizing speed when building your scene
If you’re struggling to fly around Lumion in a smooth and fluid way, you can speed it up by adjusting a few settings. Go to the ‘Settings’ menu by pressing the ‘Settings’ button - shown in the picture below.

By lowering the editor quality and/or resolution you will increase the speed of the editor, which means that you can more quickly fly around your Lumion scene. Hover the ‘help’ icon at the lower right corner to see what effects in the editor change by lowering the quality. Note that the final rendering speed of your images, movies and 360 panoramas will not be affected by these settings.
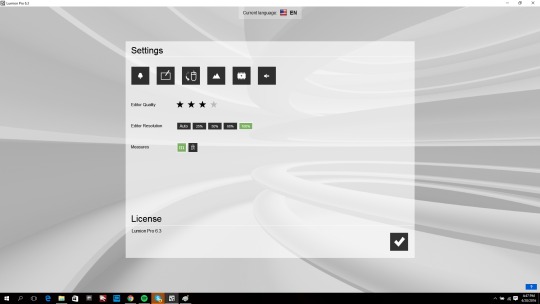
Shortcut tip: When editing your scene, it is also possible to change the editor quality without going to the settings menu. With function key F1-F5 you can change the editor quality, where F1 is low quality with the highest speed and F5 is the highest quality with the lowest speed.
#Lumion